This tutorial will walk you through the difficult process of installing Kali Linux in VMware Player, a free virtual machine manager that can be downloaded from www.vmware.com. This tutorial assumes that you have some basic knowledge of your computer (amount of RAM number of processors, etc.) This tutorial is also intended for beginners who haven’t worked with VMware or Kali Linux before.
Step One:
Step Two:
Download via direct link or torrent.Step Three:
When Kali has finished downloading, open VMware Player and click Create a new virtual machine.

Step Four:
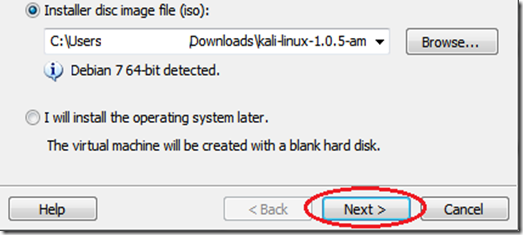
In the window that opens, select Installer disc image file (iso) and browse to the location of and select the Kali Linux ISO file that you just downloaded.

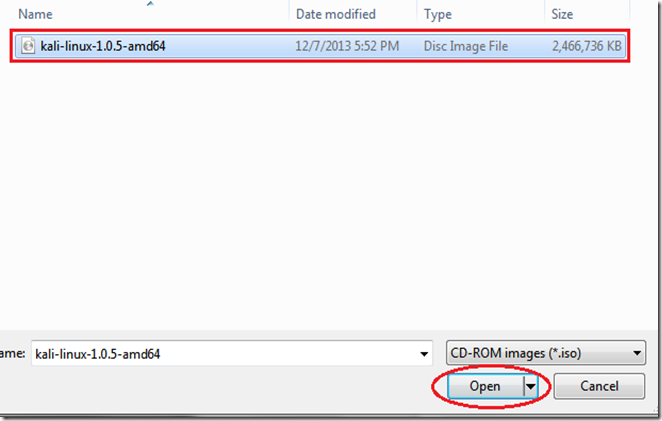
Once you have selected the file, click Next.
Step Five:
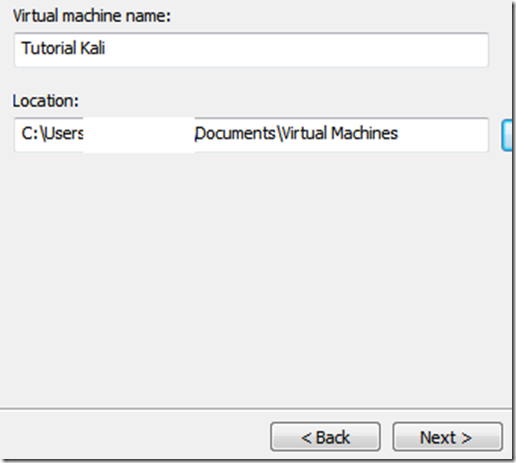
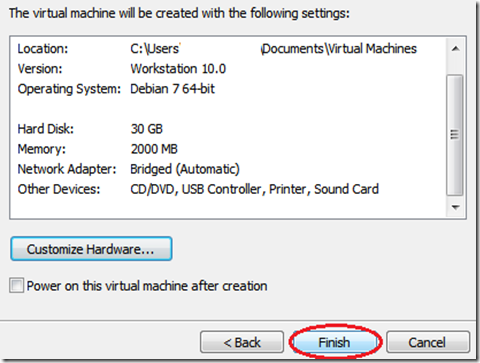
In the next step, select a name for the virtual machine. I’m going to name it Tutorial Kali for this tutorial. You also need to select a location for it, I recommend creating a folder called “Virtual machines” in My Documents. Then click Next.
Step Six:
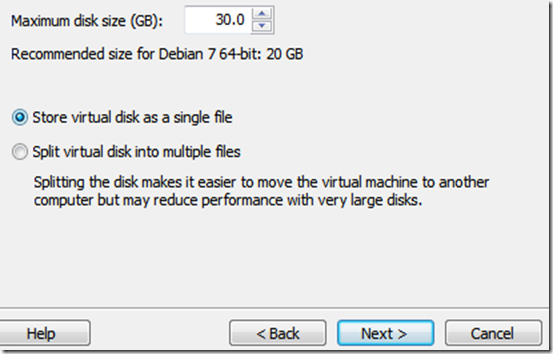
Next step, you need to select a maximum size for Kali. I recommend doing at least 30 GB’s as Kali tends to expand over time. After you’ve entered your desired value (no less than 20 GB) change the next option to Store virtual disk as a single file and click Next.
Step Seven:
In the next window, we need to customize some hardware settings, so click on the Customize Hardware… button.
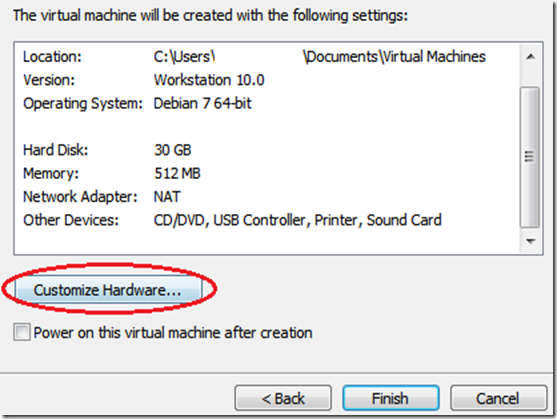
Step Eight:
You will now be presented with a Hardware window. In the left pane select Memory in the left pane of the window, and slide the slider on the right side to at least 512 MB*. This is for performance. Since I have 8 GB of RAM on my computer, I’m going to put it at 2 GB’s (2000 Mb’s).*Note, you should give a virtual machine a maximum of half the RAM installed on your computer. If your computer has 4 GB of RAM, then the max you want to slide it to is 2 GB. If your computer has 8 GB, then you can go to a max of 4 GB etc..
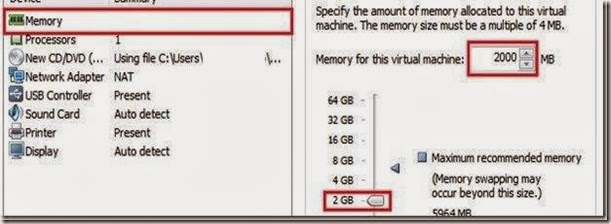
Now highlight Processors in the left pane. This option really depends on your computer, if you have multiple processors, then you can select two or more. If you have a regular computer, with two or less, then I suggest leaving this number at one.

Moving on, click on Network Adapter in the left pane. On the right side, move the dot to theBridged (top) option. Now click on the Configure Adapters button.
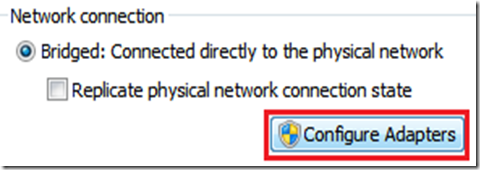
In the small window that pops up, uncheck all the boxes except for the one next to your regular network adapter and hit OK.
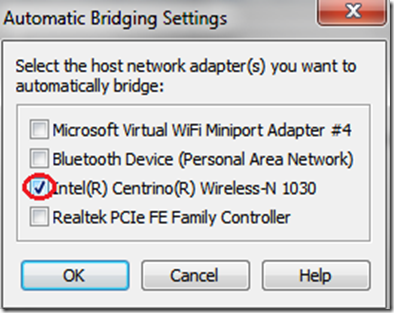
You can now click on Close at the bottom of the Hardware window and then click on Finishin the Wizard.
Step Nine:
After you click Finish the window will close and the new virtual machine file will be added to the VM library. Now all we have to do is start Kali and install it! To do this, highlight the name of the newly created virtual machine by clicking on it, and click Play virtual machine in the right pane.

This will start Kali for the first time.
Step 10:
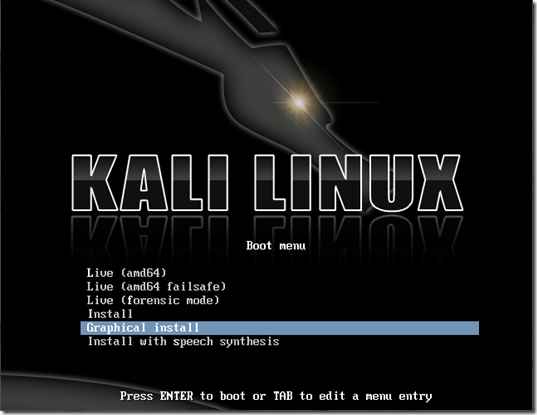
At the boot menu, use the arrow keys to scroll down to Graphical install and hit enter.
Step 11:
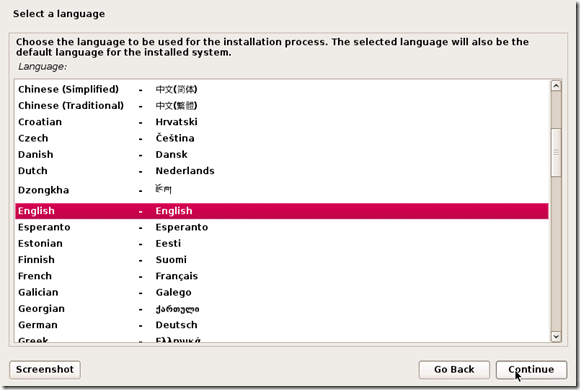
The next screen will ask you to select your preferred language, you can use the mouse to select this, then click Continue.
Step 12:
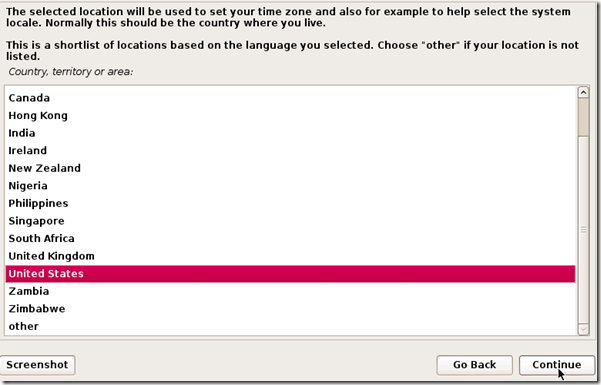
On the next screen, select your location and hit Continue.
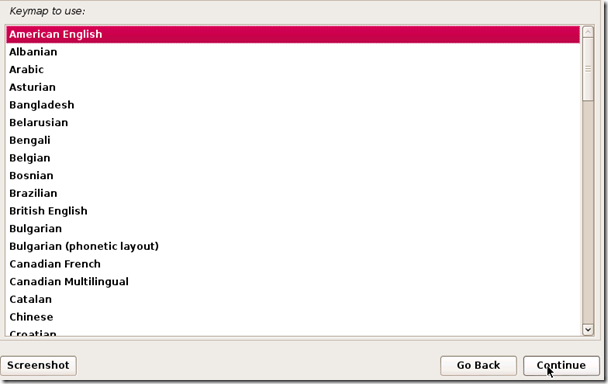
It’ll now ask you for your standard keymap. If you use the standard American English keyboard, then just click Continue.
Step 14:
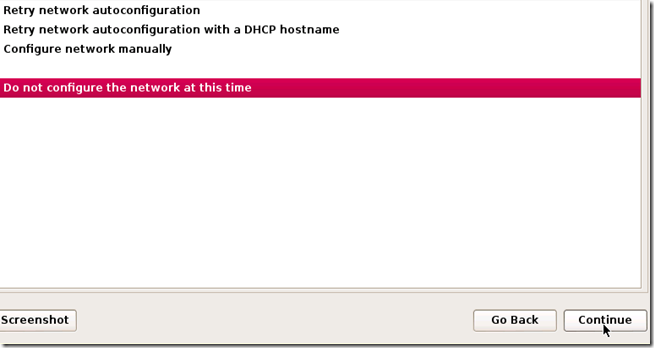
Wait until Kali finishes detecting the hardware on your computer. During this, you might be presented with this screen:

Just hit Continue and select Do not configure the network at this time on the next screen.
Step 15:
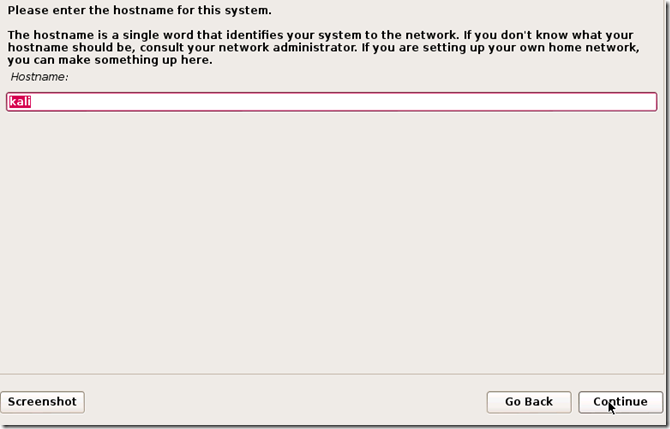
You will now be asked to supply a hostname, which is kind of like a computer name. You can enter anything you want, or you can just leave it as kali. When you’re done, hit Continue.
Step 16:
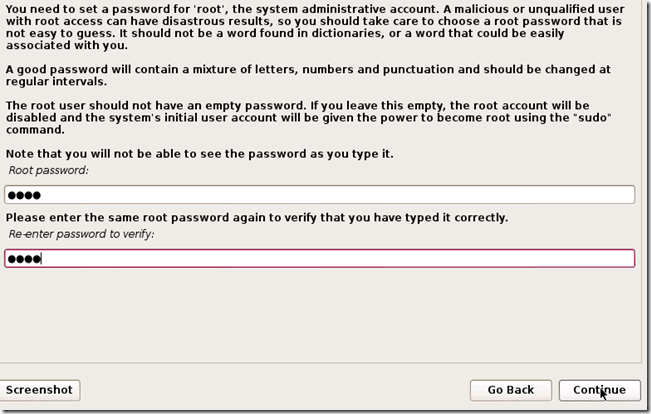
Kali will now ask you to enter a password for the root (main) account. Make sure you can easily remember this password, if you forget it, you’ll have to reinstall Kali. Hit Continue after you’ve enter and re-entered the password of your choice.
Step 17:
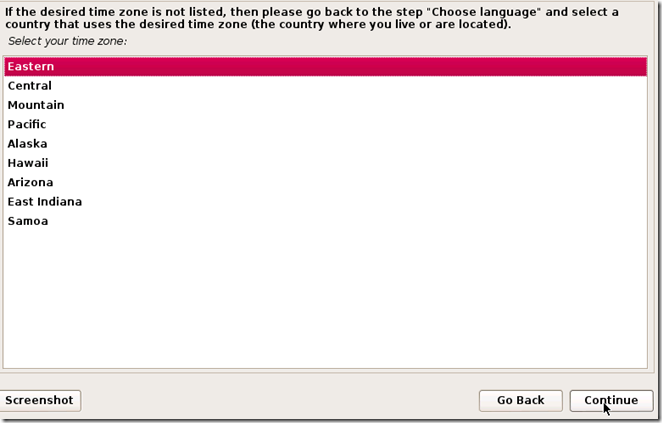
The next step will ask you for your time zone, select it and click Continue.
Step 18:
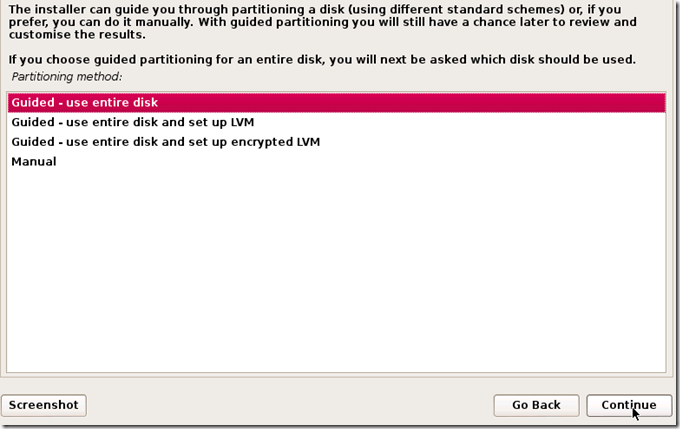
Wait until Kali detects the disk partitions. When you are presented with the next step, selectGuided – use entire disk. (this is usually the top option) then click Continue.
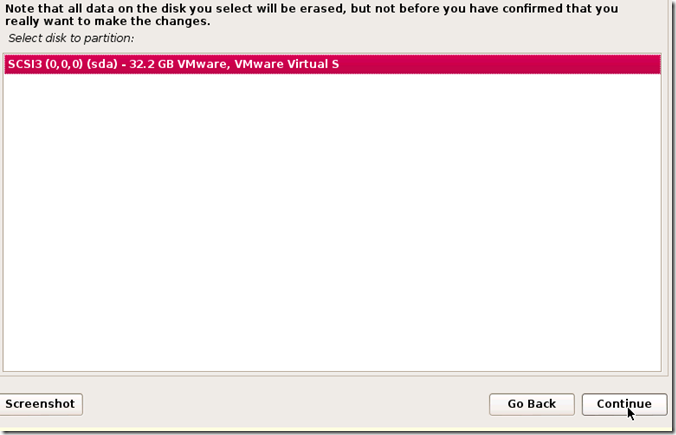
The installer will now confirm that you want to use this partition. Hit Continue.
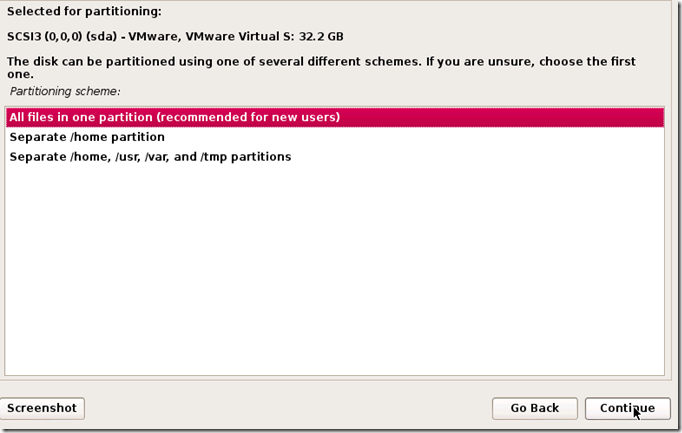
One more question about the partition will appear. Select the option that says All files in one partition and hit Continue.
Step 19:
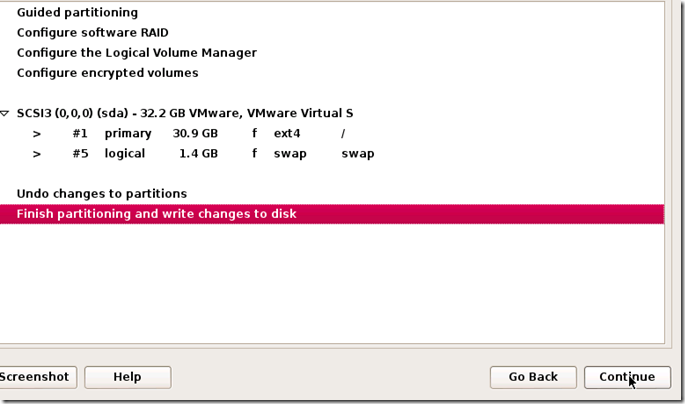
Confirm that you want to make these changes by selecting Finish partitioning and write changes to disk. Then hit Continue.
Step 20:
The last question! Confirm that you really want to make these changes by moving the dot toYes and hitting Continue for the last time.
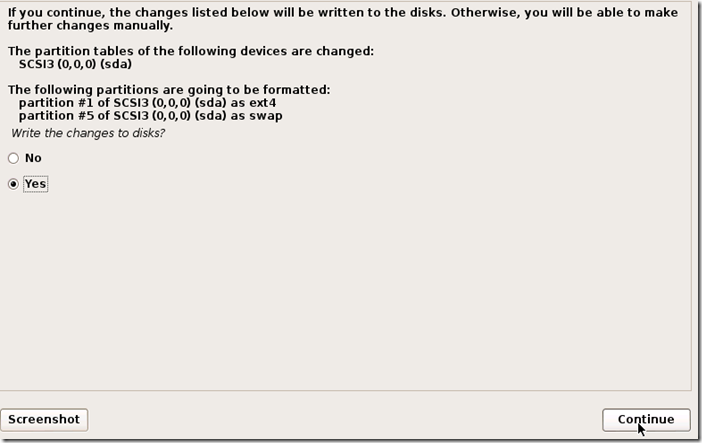
Kali will now start installing! Wait until it has completed, this might take upwards of 30 minutes.
Step 21:
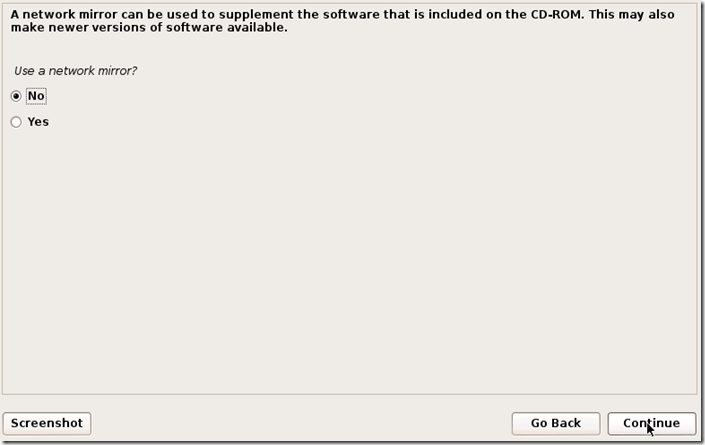
Alright, Kali has finished installing and now you are presented with a window that asks you about a network mirror. You can just select No and hit Continue.
Step 22:
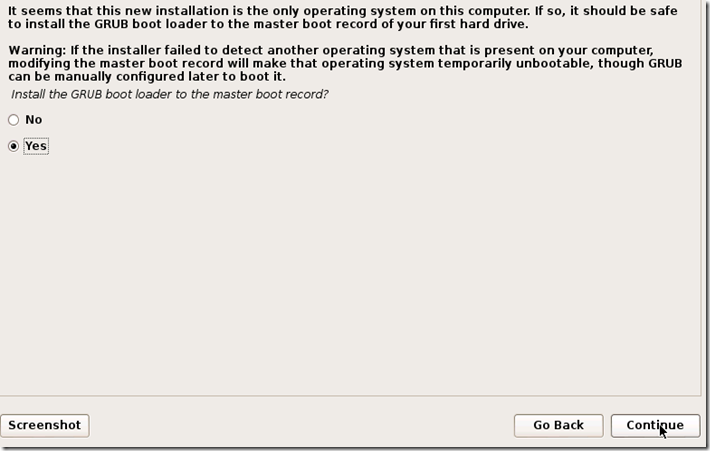
After a few minutes, the installer will ask you if you want to install GRUB boot loader. Click Yesand Continue.
Step 23:
The installation should now complete, and you’ll be shown with the following notification message:

Click Continue.
Step 24:
After it restarts, login to it with the user name root and the password that you created earlier.


i have one problem, i cant get graphical install option at step 10. what can i do
ReplyDeletethnxx i will try n then tell u this is working or not
DeleteGood luck (y)
DeleteEnable PAE
DeleteCan VmWare workstation be used for this??
ReplyDeleteCan VmWare workstation be used for this??
ReplyDeleteDefinitely.
DeleteSir, what if I'm total newbie to Linux in general. what should I learn in order to work on Kali ?
ReplyDeleteStart using Kali (or any other Linux distribution, like Ubuntu) as your primary operating system. Use it to surf the web, check mail, etc. Just forget about Windows and everything on Linux. Try to use as little GUI as possible and use cli (terminal) to do everything (copy things from one place to another, unzip archives, mount removable media, etc.) After a while you'll get hang of things.
Deletei will read every day this blog, cause i wanna learn kali by myself :v
ReplyDeleteplz you help me learning kali linux from start i want to learn hacking
DeleteCan you make a tutorial about set network configuration also, because the screen said network autoconfiguration is failed and you said to choose 'do not make network configuration now' Thanks:)
ReplyDeleteHELP ME
ReplyDeletenot showing up wlan ? in ifconfig command ? what can i do?
ReplyDeleteYou can't access wifi in virtual kali linux to use wifi buy a usb dongle and plug and play it in kali
DeleteAfter step 20 I always get '' Installation step failed '' any help here ? Thanks !
ReplyDeleteCan we use virtualbox for installing kali?
ReplyDeleteHi all when I'm trying to power on it says Failed to load ldlinux.c32 anyone knows what's going wrong?
ReplyDeleteI installed it in VM vartual box. But not showing wlan with ifconfig command on my wifi. If i install it dual boot mode with Windows 10 then it showing or not?
ReplyDeleteYes. It will show
ReplyDeleteHow is you are able to use your wifi card in Kali? I thought wifi passthrough is not possible. Do I need to get a usb wifi adapter for sure?
ReplyDeleteNever mind. I should have looked at the other comments, please disregard.
DeleteThis blog is just awesome.. I am a beginner to kali linux and ur bloag is helping me a lot.. Bt i hv a few doubts.. I am using VMWare workstation 11.. when i was installing Kali, it asked me which linux distribution are u using?? I selected the option: Debian 7.x Is it correct? If not, can u tell me which option should i choose??
ReplyDeleteAlso, i hv another problem.. In the Network Adapter, when i click bridged connection, there is no option of configure adapters.. i dont know if it isnt included in VMWare workstation 11 or not, but i am unable to use my wifi connection on the virtual machine.. PLZ HELP ASAP...!!!
Thanks in advance..
Debian 7.x is fine (you can choose any random distribution and get away with it, it usually doesn't make any difference what choice you make).
DeleteYou can't use your wireless adapter on your VM. You can access the internet by using NAT (i.e. you can use the host's internet connectivity on your guest). NAT is much simpler than bridging connections and it does everything automatically for you.
I have installed it and everything went smooth but when I launch it, it asks me about a boot option between booting the OS or open advanced boot options, and no matter what I do I just get an error message telling me that something went wrong and that I should contact the system administrators. I don't know what goes wrong but when it's booting I get a little glimpse of some of the steps it goes through, and 2 of them failed, I don't know what these steps are because It simply disappears before I have a chance to do anything. plaese help, and thanks in advance :)
ReplyDeleteis the GRUB boot loader necessary?
ReplyDeleteIt fails when I try to install it. I hope it isn't that important, but I think it is.
DeleteThe Grub bootloader is mandatory when you need to operate two or more os-es on the same machine. Select a partition Ext4 as root (/) when installing debian and select the bootable flag option and set it to yes. Accept the prompt to install GRUB.
Deletehow can i install this with dual-boot ??
ReplyDeleteand how can i use the wireless adapter
Every time you download Kali iso img after that check SHA1 sum is it OK.
ReplyDeleteThanx for tutorial
ReplyDeleteI'm new to Kali and I installed it on Vmware workstation but on the reboot it keeps requesting system reboot and message is like "NMI watchdog: Bug: soft lookup - CPU#0 stuck for 22s!" and keeps repeating it
ReplyDeletePLZ HELP
very use full ........ thx
ReplyDeleteinstallation complete but kali is not working only black screen shown :(
ReplyDeletethank you so much I have been trying for days to install this and I finally succeeded with your help
ReplyDeletei installed it as the guide says but when the vmware boots up and it requests me for username and password the ones i used in the installation dont seem to work neither root or toor that is being listed as the default root username and passwrod in kali linux official page
ReplyDeleteanyone can help?
thnx in advance
how can i use my wireless device or adapter on my vmware workstation?
ReplyDeleteThanks for Tutorials
ReplyDeleteThanks for the Tutorial here's also one for 2016.1
ReplyDeletehow to install Kali linux 2016 on VMware
Can these all be inst5alled in a USB ?? the Kali Linux , Vmware and all ? i dont want to use it in my pc's hard disk , for now !
ReplyDeleteFind a thorough installation guide for Kali Linux in VMware that includes clear steps and explanations. ideal for both novices and specialists.I appreciate thanks giving your knowledge! Continue your fantastic effort! Keep sharing. I invite you to browse my website.
ReplyDeleteOnce you've selected your Emoji Kitchen the game will combine them to create a new, hybrid emoji. The combinations are often humorous, cute, or surprising, adding to the fun.
ReplyDeleteHey everyone, I found a really helpful guide on installing Kali Linux in VMware. It walks you through every step, making it super easy even if you're a beginner. Setting up your environment this way is great for experimenting. It's like having a safe sandbox to play in. Once you're done installing, you could even try using Kali to find vulnerabilities in a network. Maybe after a long day of ethical hacking, you can unwind with a game of slope unblocked.
ReplyDeleteOne of the best things about basketball stars on an emulator is the ability to customize controls. Bluestacks allows players to map keys for better gameplay, making dribbling, blocking, and shooting easier than ever.
ReplyDeleteInstalling Kali Linux on VMware Player is straightforward with basic PC knowledge. Follow VMware’s guide for setup när dog bruce willis.
ReplyDeleteStars like Kevin Hart use secure systems for privacy. Check top cybersecurity blogs for Kali tips.
17AC70674B
ReplyDeletehacker kiralama
hacker kiralama
tütün dünyası
-
-
I appreciate thanks giving your knowledge! Continue your fantastic effort! Keep sharing. I invite you to browse my website.
ReplyDeleteMedjool Date Palm in Monterey
I remember my first attempt at installing Kali Linux in VMware; it was a bit daunting at first due to the intricate steps. However, following a comprehensive guide made the process smoother than I anticipated. I found it fascinating to delve into the world of penetration testing, and Kali quickly became one of my favorite tools to learn. My journey in cybersecurity began with that installation, ultimately leading to valuable skills. If you’re looking for something fun to break away from the technicalities, I recommend the Italian Brainrot Clicker for some light entertainment.
ReplyDelete